This is a super in-depth guide to route optimization with Excel.
In this post you’ll learn how to plan and optimize routes in Excel.
But also how to use Excel with:
- Google Maps
- Excel Route Planners
- Route Optimization Software
PLUS, you’ll get access to free excel routing templates.
And whether we recommend it or not.
Let’s start.
ON THIS PAGE:
To use Excel, Google Sheets or any other spreadsheet app to plan a route, you’ll need some basic data to get started.
At the very least, we suggest that you create a spreadsheet with three columns: Name, Date, and Address:
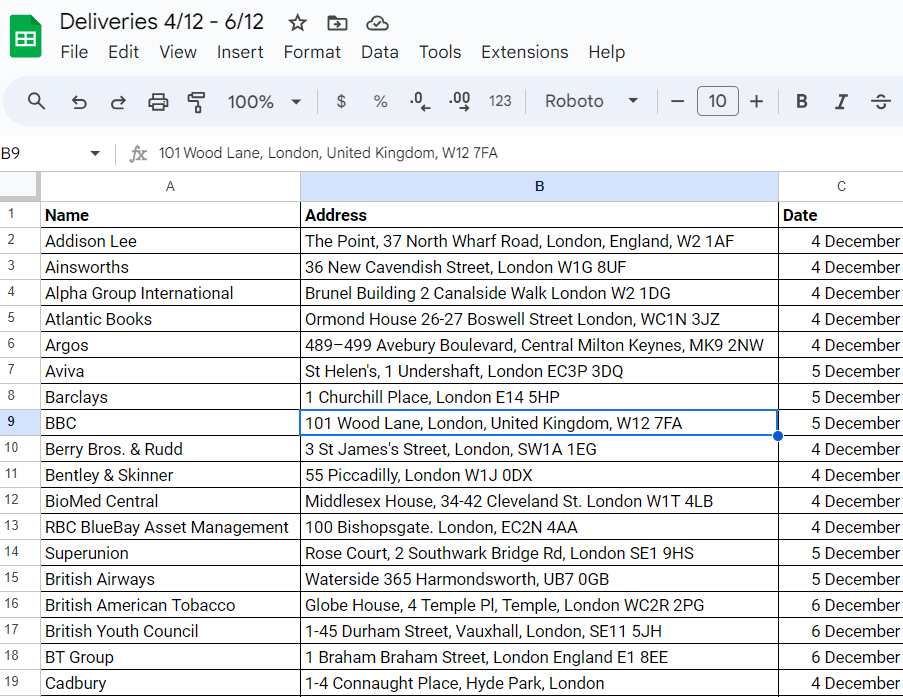
The Date column helps you to use the same file to plan routes across multiple days.
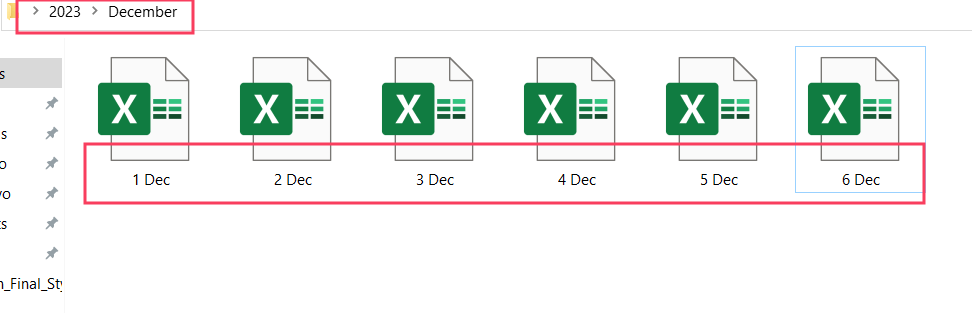
You can also skip the Date column and instead create multiple files for each date. And organize the files into folders for each month of the year:
You can also split up the Address column into:
- Street Address (Address)
- City
- Postcode / Zip Code / P.O. Box
- County / State / Country / Region
- Delivery, Driver, or Team Zones
This all depends on where you typically route vehicles. But there are benefits to doing this when it comes to optimizing routes in Excel.
(More on that later.)
You can also include latitude and longitude coordinates instead of the Address column, for greater precision:
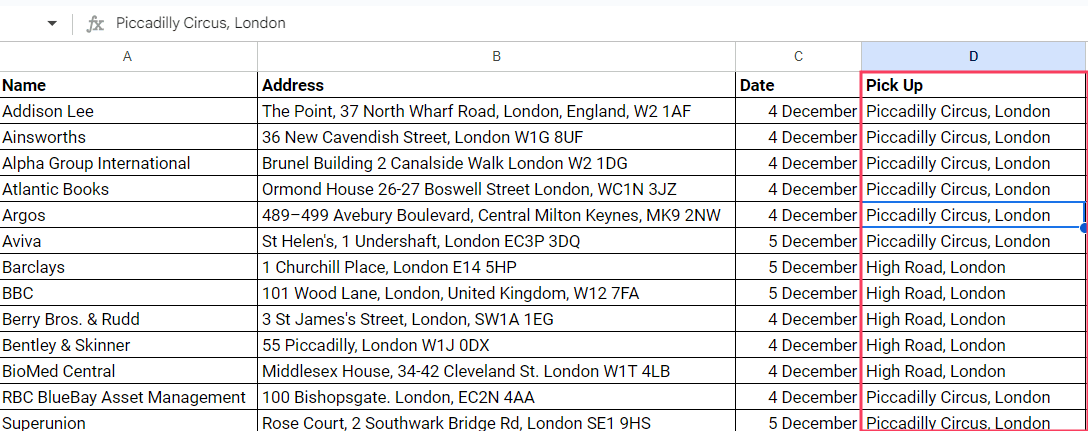
Additionally, if you have multiple pick-up locations, you might want to split the Address column into two columns: Pick-up Address and Drop-off Address. This helps you to sort drivers based on their starting destination:
But you can also add any other distinction such as:
- Driver Name
- Vehicle Type
- Weight / Size
- Order Priority
- Notes
- And more
Basically:
The more detailed the spreadsheet, the easier it is to create good routes in Excel.
Now that this is out of the way, it’s time to see how you can plan routes in spreadsheets.
How to Plan Routes with Excel?
There are two steps to planning routes in spreadsheets:
Step #1: Break up the list into smaller, more manageable batches.
If you have a long list of customers and addresses, this makes it easier to plan routes in Excel.
You can do this by sorting the entire list first by Date (if you’re using the same spreadsheet for multiple dates):

And then creating smaller batches by selecting the addresses on specific dates and sorting them either by Driver Name (Team or Vehicle):

Or sorting it based on the Zone or City (or County, State, Region, or Country, depending on how many deliveries you handle and where you typically deliver those goods to customers):

Next…
Step #2: Freeze the first row in your spreadsheet.
Freezing the first row means you’ll select the starting point (depot address) for your route.
To do this in Excel:
1. Select the row you want to freeze.
2. Go to the View tab, and then click on Freeze Panes > Freeze Panes.

To do this in Google Sheets:
1. Select the row you want to freeze.
2. Go to the View tab, and then click on Freeze > 1 row.

Once, you’ve done that…
Step #3: Sort by Postcode (or Zip Code or P.O. Box).
Select the Postcode column within the data range that you want to sort (based on Step #1). And then sort it by its numerical value.
To do this in Excel:
1. Select the column and data range you want to sort.
2. Go to the Data tab, and in the Sort & Filter group > A/Z down arrow symbol to sort the data range in ascending order (smallest to largest):

To do this in Google Sheets:
1. Select the column and data range you want to sort.
2. Go to the Data tab, click on Sort sheet > Sort range by column X (A to Z).

And you’re done.
You have just bucketed specific addresses based on their postcode. Which makes it much easier to assign to specific drivers.
But you didn’t quite plan a route. And you might want to have more control over your routes.
To see what the routes actually look like on the map. Or get visibility over where your drivers are on the map… What stops have been completed. And what destinations remain on the route.
Don’t worry. We’ve got you covered…
How to Plan Routes with Excel and Google Maps?
You can plan routes on Google Maps. But there are more than a few limitations.
One of them:
You have to manually add each stop one at a time. Which does take up A LOT of time.
However…
You can bypass this by using a spreadsheet with Google Maps. So…
Here’s how you can plan routes with Excel and Google Maps, step by step:
Step #1: Export your spreadsheet.
We recommend that you save your spreadsheet in .CSV file format.
To do this in Excel:
1. Go to File > Save As.
2. Type in the name of your file.
3. In the Save As Type dropdown menu select CSV.
4. Click Save. And you’re done.

To do the same in Google Sheets:
Go to File > Download > Comma Separated Values (.csv)

The file will be automatically downloaded to your computer.
Step #2: Upload the file to Google My Maps.
You can access your Google My Maps account here.
Typically, you’ll have a My Maps account if you have a Google account.
Once there:
1. Click on the Create a New Map button:

2. Type in a name for your map:

3. Click the Import button in the top left corner:

4. Either drag and drop the .csv file from your Downloads folder:

Or browse it manually on your computer:

Step #3: Select the columns you want Google to use for your stop addresses.
Once the file is uploaded, a pop-up window will appear with the names of the columns in the file:
If you only have an Address column, select that.
If you’ve separated your Address column into multiple columns, like City, Postcode, State, etc.select all of them:

And if you’ve created a column with longitude and latitude just select those columns.
Step #4: Select additional information you want Google to display on the map.
After you’ve chosen the stop addresses, the next step is to choose the columns you want Google to display as additional information on each stop. Typically, this could be the Name column, but also Driver Name, Time Window, and others:

Step #5: Pin your stops on the map.
Once you have completed the previous steps, click Finish.
Google Maps will then place pins to each address from the spreadsheet onto the map.

Step #6: Choose a start point to plan your route.
To plan your route, click on a stop where you want the route to start from. You’ll see a pop-up window appear above the pin with the information from the spreadsheet.
Click on the arrow icon to start planning your route:

Step #7: Add all of the stops on the route.
Once you’ve selected the first stop, a panel will appear on the left side of the screen.
From here, click Add Destination to add the remaining stops on your route:

After you add all of the stops on your route, the map will look something like this:

The big problem here is that you’ll have to determine the stop order by yourself.
And you can’t take into account delivery time windows, vehicle capacities, driver breaks, and other factors that determine the efficiency of your route.
Plus, you can only add up to ten stops per route. And the route you end up with may be the shortest one between all your stops. But it is NOT the most optimal one.
That’s where route optimization software proves to be a better solution.

How to Plan Routes with Route Optimization Software and Excel?
Before we get into how you can plan routes with route optimization software and Excel, we want to point out a few things.
First, route optimization software is NOT free.
(At least the best solutions on the market like eLogii)
But precisely because it’s not free, you get more bang for your money.
In other words:
You get a lot more functionality and capabilities than either Google Maps, or any other free tool.
In fact, you get 90+ different features with our routing software.
Which means you can plan and optimize routes for 10,000+ stops and just as many vehicles or drivers, and:
- Dispatch drivers automatically
- Collect proof of delivery in real time
- Track drivers, vehicles or orders live
- Collect and evaluate delivery analytics
- And more
Second, we are biased. (As you may have guessed.)
But we really do believe that our product is worth it. That it can actually solve your problems. Plan better, more efficient routes. And save you money in the process.
Third, you don’t have to rely only on spreadsheets to plan routes.
With route optimization software, you can add tasks manually and import .csv files. The same with Google Maps (without the ten stops per route limit).
But you can also use the routing API to plug into any business system, software, or app.
That means:
You can connect the software with your order management system to turn orders into tasks on your route AUTOMATICALLY and in seconds.
And if you’re using Excel, planning routes with route optimization software is much easier than any other alternative.
Here’s how you can do it with eLogii:
Step #1: Import the spreadsheet.
Like before, we recommend that you save the spreadsheets as .CSV files.
To do this with eLogii:
Go to Tasks and in the Import tab you can drag and drop the file or click the blue button to browse the file on your computer:

If you don’t have a .CSV file ready, you can download the free template from the dashboard:
The spreadsheet that you upload has to have the following data:
- Date/Date Range (depending on your account configuration)
- Pickup UID (your Depot UID for example) or pickup address (along with the address, postcode, city and country are mandatory) or Pickup Longitude and Latitude
- Dropoff UID (a Depot UID or Customer UID for example) or Drop Off Address (along with the address, postcode, city and country are mandatory) or Drop Off Longitude and Latitude
- Default Size/Unit (or any other dimension previously set up by you in Configuration, for example “Weight” or “Boxes”)
(Other columns in the template are optional.)
Step #2: Preview and validate the uploaded file.
After the file is uploaded to the dashboard, you can preview the data and validate it:

If everything is correct, you can move on to the next step.
If the system notices errors, it will display them in the preview:

You can toggle between viewing all tasks and errors. And then you can:
- Correct the errors directly on the dashboard;
- Skip the errors and move onto the next step, or;
- Download a spreadsheet with the errors to correct them in Excel.
Step #3: Geocode addresses.
The next step is to geocode the addresses from your spreadsheet.
To do this:
1. Go to the Geocode tab.
2. Click on the Geocode addresses button.

NOTE: In case you’ve used UIDs (existing customer or depot addresses stored in the dashboard) or exact coordinates (longitude and latitude), you can skip this step.
Step #4: Configure tasks for routing and optimization.
In this step, all you need to do is to configure how you want the software to recognize duplicate tasks:

This is especially useful if you have multiple tasks for the same address.
Step #5: Import tasks to the route planning dashboard.
Finally, you have to import the tasks by going to the Import tab and clicking the Import button:

Here, you can also view all imported tasks:

And now, all of the tasks (stops on your route) are uploaded to the route optimization software.
Step #6: Plan and optimize the routes.
Once all of your tasks are imported into the dashboard, you can start planning and optimizing routes:

All of the tasks are visible under Tasks on the main screen:

You can let the software automatically group stops to create routes and assign them to drivers:
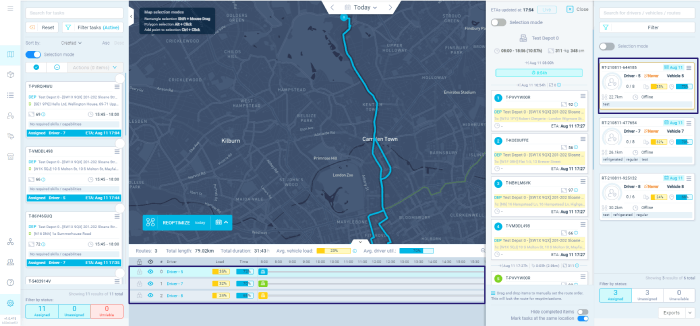
The software will also take into account multiple factors like time of arrival, driver breaks, max. no. of stops per route, stop orders, stop density, and more. All of it for maximum efficiency.
For a full rundown of eLogii, read how route optimization software works.
Free Driver Schedule Templates in Excel
Wait a second!
If you’re not yet ready to automate your route planning process, we got you covered.
We’ve created driver schedule templates in Excel that you can download for free.
This will help you speed things up, until you make the switch from manual to fully automated route planning.
You’re welcome…
Route Optimization: Is It Worth It?
Excel and spreadsheets are still the most widely used tools for route planning.
But are they the best?
No.
Excel does help you to organize stops when planning routes. But the biggest problem is that you still have to perform a lot of tasks manually.
Pairing Excel with Google Maps does automate things.
It’s still free. And it gives both drivers and route planners the chance to view the routes on the map.
Google Maps also has other benefits like allowing you to choose the stop order and Google’s traffic monitoring system.
But the truth is that Google Maps has its limitations, too. Chiefly, you can plan only 10 stops per route. And the routes you do plan are the shortest, not the most efficient.
And that’s a problem, especially for people and businesses that have to plan hundreds of routes each day.
That’s why our customers and many others choose to automate. And choose route optimization software.
This enables them to create numerous routes with multiple stops for multiple drivers and across multiple days. Usually, several times per day. And in the fraction of the time it would take to do it with either spreadsheets, or in combination with free software.
And despite the fact that it looks complicated (when compared to simple spreadsheets), routing software quickly becomes part of the work routine for everyone who chooses to use it.
So, overall, we still recommend using Excel, but in combination with route planning software.

